

 Google Maps is an online map service that can help you find your location and your desired destination. It shows detailed information about geographical regions, cities, and sites around the world. Thanks to its aerial and satellite views, it adds conventional road maps and street views with clear photographs. It is very helpful whenever you plan to travel and are not familiar with your destination. However, Google Maps needs a good internet connection before using it, and not all places provide an internet connection. That is why we will show you how to take screenshots on Google Maps, which is very convenient when traveling. Keep on reading.
Take Screenshots on Google Maps Using your Keyboard
If you want a quicker way to take a screenshot of Google Maps on Windows or Mac computers, you can do it by using your keyboard. It is faster than opening an application on your computer. However, you won't have the option to edit the image by putting annotations or cropping it. To begin, you can follow the steps below.
1. For Windows keyboard
What is it best for? Since it does not require you to open any software for taking screenshots, it is best to quickly take screenshots of movies and games.
Step 1 Buttons to Take Screenshots
Once you are in Google Maps, you can easily take a screenshot by pressing your keyboard's "PrtSc" key. You can find it in the upper rightmost part of the keyboard, and it is usually beside the "ScrLk" and "Pause" keys. You can also hold down the "alt" key and then press the "PrtSc" to take a screenshot of a single active window.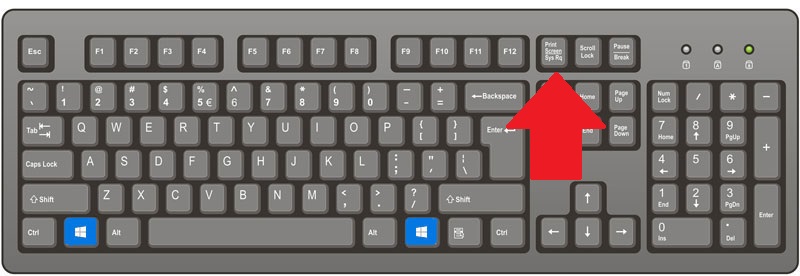
Step 2 Paste the Screenshot
After that, the image is copied on the clipboard. You can paste it on documents, chatbox, and editing software like paint by pressing "Ctrt+V" on your keyboard. From there, you can send, edit, or save the captured image.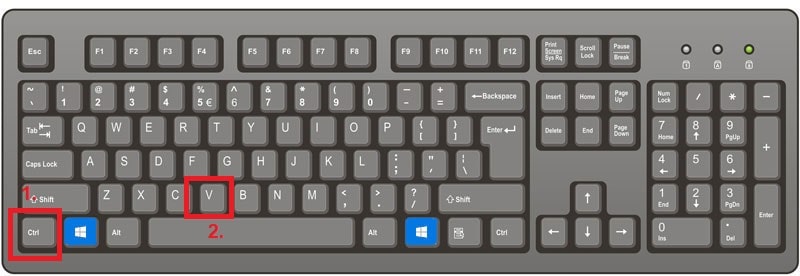
Extra tips: You can also press the "Windows + Shift + S" keys and use your mouse to specify the area where you want to capture.
2. For Mac keyboard
What is it best for? This tool is great for taking screenshots on Mac applications in HD quality. It will not reduce the quality of the image.
Step 1 Needed Keys to Take Screenshot
You can start taking screenshots in full-screen on your Mac by pressing "Command + Shift + 3" simultaneously. You can also press "command + shift + 4" to choose a specific area before taking screenshots.
Step 2 Find the Capture Image
Once done, the image won't open automatically. You can find it on the desktop with a file name "Screenshot (date) (time).png." Also, you can find the captured image within the Finder.
Extra tips: Press "command + shift + 6" keys to capture the entire touch bar and save it as a file on the desktop.
Default Way on Taking Screenshots on Google Maps
If you don't want to use a 3rd party app when taking a screenshot on Google Maps, Windows and Mac computers have a default way to do it. These tools are pre-installed software on both Windows and Mac platforms, which means you don't have to pay anything to use these tools. It will surely help you picture Google Maps in HD quality. Now, let's continue reading below to see both of them.
1. Snipping tool
What is it best for? It is best for taking screenshots when you need to send them on chats because you can copy them quickly and paste them ino the chatbox.
Snipping Tool is a screenshot utility on Windows Vista, and later that can take a screenshot on Google Maps in full-screen or region mode. It has the necessary editing tools that have different colored pens, erasers, and a highlighter. Besides, it can save images without reducing the quality. To know how to use this tool, check the simple steps below.
Step 1 Launch the Snipping Tool
The first step in taking screenshots on Windows is easy. You can open the "Snipping Tool" by searching it on your "Start" menu. This tool is installed on Windows 7 to 10.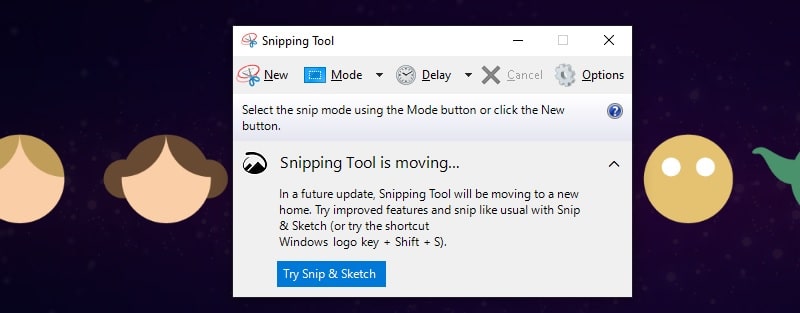
Step 2 Take Screenshots
Once launched, you can click the "Mode" option to choose if you want to take screenshots in full-screen, region mode, or window mode. To start, click the "New" button at the leftmost part of the tool and select the area that you want to capture. A new window will appear once you take a screenshot. You can keep the image by clicking the "Save" icon in the upper middle part of the preview window.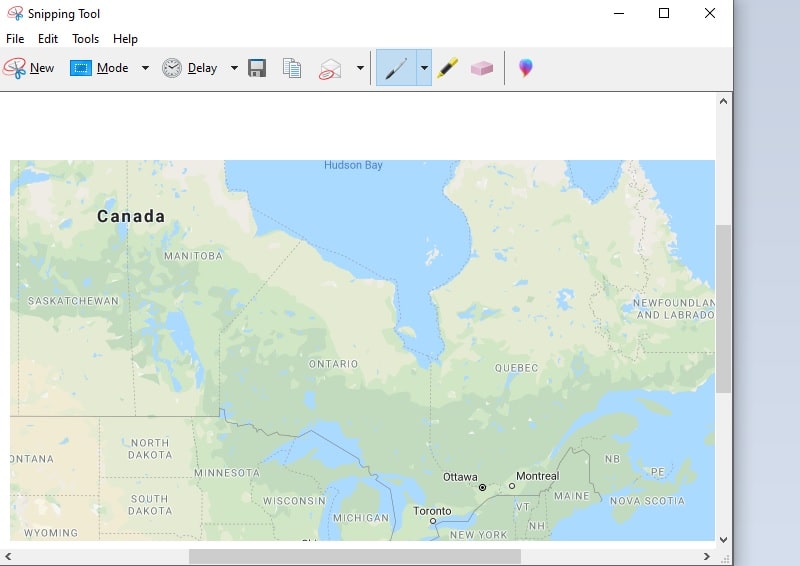
Extra tips: Snipping Tool can send the captured images to Paint 3D. This will edit the photo using advanced editing tools like blur, watermark, adjusting contrast, and more.
2. Preview
What is it best for? Preview is best for taking screenshots on Mac, especially if you don't have an internet connection to download 3rd party apps.
A preview is a pre-installed tool on Mac computers that can fill out and sign forms, protect confidential documents, and more. You can also use this free screenshot software to take a screenshot of Google Maps and transfer it to your iPhone to use when you travel. All images taken by Preview are in HD quality or retain the original quality shown on your Mac screen. You can follow the steps below to start using this tool.
Step 1 Open the Preview
Open the "Finder" on your Mac, and then select "Applications" at the leftmost part of the folder. Then, double-click on the "Preview" to open its app. You can find it at the top of your Mac's desktop screen.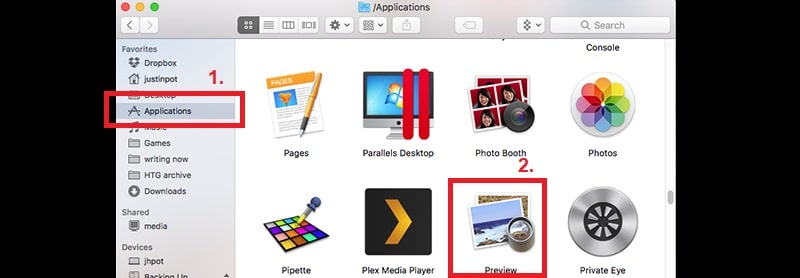
Step 2 Begin Taking Screenshots
Next, click the "File" menu located on the menu bar of Preview at the top of the screen and hover your mouse over "Take Screenshot." Then, choose "From Selection," "From Window," or "From Entire Screen," depending on your liking. Once you take a screenshot, the image will be saved automatically on your Mac. You can find them on your Mac's desktop screen.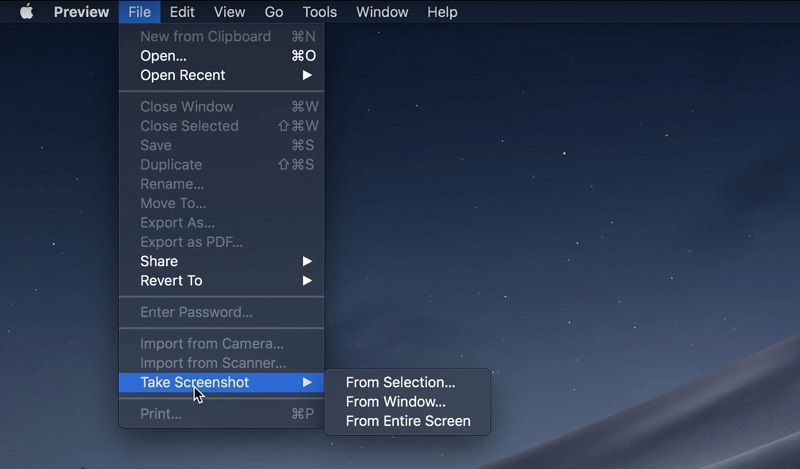
Extra tips: This tool can also import images from the scanner and camera, and you can print them along with the captured image.
Best App for Taking Screenshots on Google Maps
What is it best for? It is best for screen recording videos along with its audio. A good example is making a video blog, tutorials, gameplays, demos, and more.
AceThinker Aqua Demo is a screen recorder tool that can capture any activity on your computer screen. Still, it can also take screenshots on it. You can use this tool like a snipping tool but in a high-resolution image. It also allows you to draw shapes, lines, arrows and put text on the photos before saving them. You can also choose your screen area if you want to take a screenshot in full-screen or in regional mode. To know how to use this tool, you can find the steps below. With this tool, you can also record Google Earth videos easily and quickly.
Try it for Free
Step 1 Get the Installer of Aqua Demo
To get the installer of this tool, you can click the OS of your computer from the “Download” buttons above and launch it afterward. Just follow the setup wizard guidelines to install it on your computer.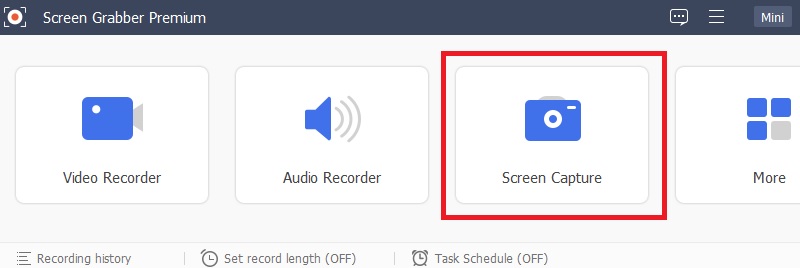
Step 2 Start Taking Screenshots
Once installed, run the software and choose the “Screen Capture” mode within its main interface. It will then prompt you to select the area of your screen that you want to capture. You can bring and click the cursor to any corner of your screen for a full-screen screenshot. Or, you can drag the cursor on the area that you want to take a picture.
Step 3 Edit and Save the Image
After taking a screenshot, it will show you its editing toolbar that you can use to add annotations on the picture. It lets you draw shapes, lines, arrows, or add texts to it. You can refer to the rightmost part of the editing toolbar to save the picture to your computer. You can also click the "Copy" button, paste it to Paint, Photoshop, or send it directly to email or chatbox.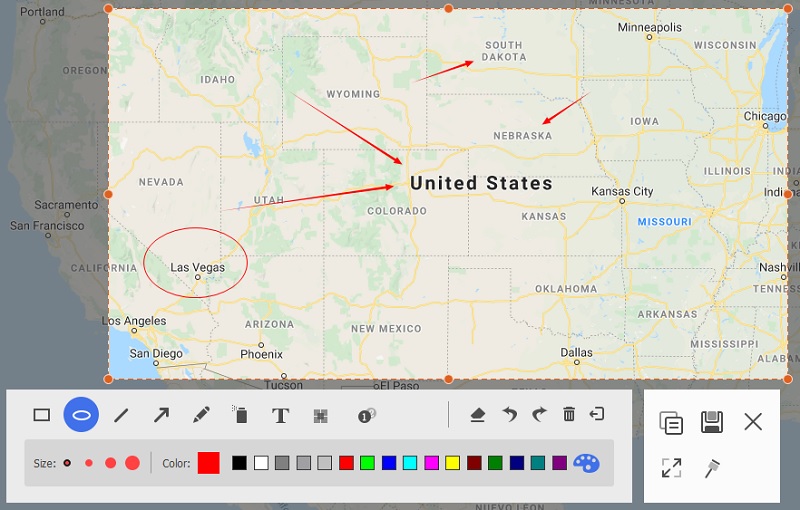
Comparison Chart
| Taking screenshots on keyboard | Snipping Tool | Preview | AceThinker Aqua Demo | |
|---|---|---|---|---|
| Ratings | 4.5 | 4.5 | 4.7 | 4.8 |
| Supported Image Format | JPG | JPEG, PNG, GIF, HTML | TIFF, PNG, JPEG, GIF, BMP, PDF | JPG |
| Editing Feature | None | Yes | Yes | Yes | Accessibility | It is the easiest way to take a quick screenshot with just a few press on your keyboard. | You can take a quick snapshot of your entire screen or part of your PC screen, and add changes or notes before sharing or saving them. | As long as you launch the Preview on your Mac, you can use it by referring the toolbar at the upper part of your Mac, making it simple for you to take screenshots. | It has a clean and straightforward user interface that lets you take a screenshot with just one click. | Is it free? | Yes | Yes | Yes | Yes |