-
Multimedia
-
Doc & Utility Tools
- Professional Users
- Edit PDF
- Convert PDF
- Create PDF
- Annotate PDF
- Combine PDF
-
HowTos
-
Free AI Tools
-
More Free Tools
-
Support
-


Download the Aqua Demo from its official website and run its file installer. Afterward, you can now launch and use the software successfully.
Open the software and click on the "Video Recorder" window to set your desired recording mode. Select "Full" or "Custom" mode, depending on your preference.
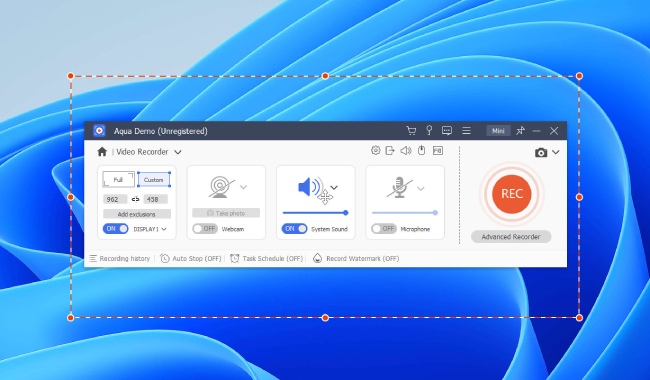
Once you set the recording setting, click the "Rec" record screen button to start capturing your screen activity. Hit the "Pause" or "Stop" buttons to pause or stop the recording. Preview to make sure everything goes well and save it to your computer hard drive.
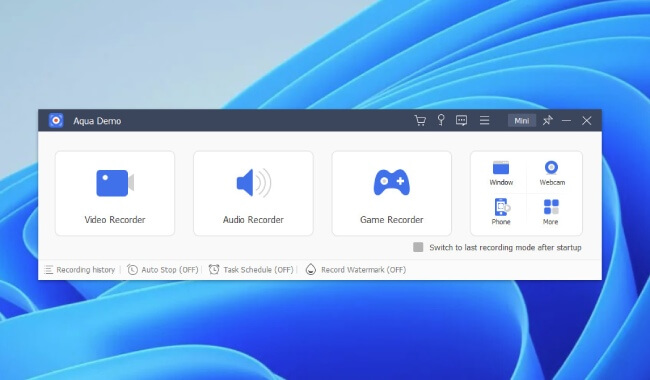
Want to record your computer screen in HD without any hassle? Try Aqua Demo screen recorder! It's a remarkably software that can help users capture their screen smoothly. With it, you can record high-quality videos and audio and even edit them later. It's perfect for vloggers, teachers, or anyone who needs to record their screen. So, why wait? Start capturing your screen like a pro with it today!

Aqua Demo is the best software to record screen. It has a straightforward interface that is ideal for recording computer screens easily. With its streamlined design and intuitive controls, users can start recording their screen activity with just a few clicks. Its customizable options and flexible settings allow users to tailor their recording experience according to their preferences. Plus, no technical expertise is required to operate the software and start recording screen activity.

High-quality recording with crystal clear sound and smooth visuals. Users can pick from various resolution options such as 720p, 1080p, or even 4K resolution. Aqua Demo ensures their screen activity is captured in the best possible quality. Moreover, users can record screen on PC with or without audio. It provides flexibility in capturing different types of content.

Users can customize their recording options with features such as recording area, audio source, and video quality. The recording mode can be adjusted to capture the full screen, a specific window, or a selected region. Users can also choose their preferred audio source, whether system sound, microphone input, or both. Users can also set the video frame rate and bitrate when capturing screen activity according to their requirements.
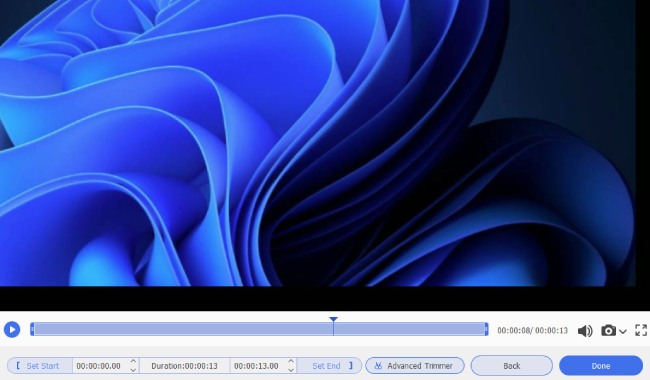
We provide editing tools that lets users trim, cut, and add annotations to their recordings. These editing tools enable users to refine their captured screen activity and add professional touches to their recordings. It offers a real-time drawing feature where users can draw on the screen while recording. You can use lines, shapes, ellipses, and more to highlight noteworthy topics or draw attention to specific areas. After recording, you can trim the excess parts of the videos and make seamless edits to create a polished final product.

This tool supports numerous output formats such as MP4, AVI, WMV, and more. Users have the option to pick their desired output format. Capturing online streaming content from various sites such as YouTube, Vimeo, or Netflix is made easy with the tool's ability to save recordings in different formats. Users can even convert their recordings to specific formats appropriate with different devices, such as smartphones or tablets, for easy sharing and playback.
Add on-screen annotations, including text, arrows, shapes, highlights, etc. to emphasize important points or provide additional context.
Further enhance the clarity of your screen recordings by enabling the mouse and click effects feature on the screen.
Set a specific time and duration for the screen recording to start and stop automatically using the software's task-scheduling feature.

Quickly capture still images of your screen and save screenshots in the most popular images formats like JPG, PNG, GIF, or BMP.


Reach out for inquiries, support, collaborations or any information you may need. We're here to help.
Customer Service Specialist

